Why Organize Your Small Woodshop?
If you're a beginner woodworker staring at a cluttered garage or shed, feeling overwhelmed is normal. Organizing a small woodshop on a budget can transform chaos into a functional space. This guide walks you through practical steps tailored for tight spaces like a one-car garage.
You'll learn affordable hacks, DIY projects under $50, and tips to keep things tidy long-term. No fancy tools needed—just smart planning.
Step 1: Assess Your Space and Tools
Start by taking stock. This prevents buying unnecessary storage.
Walk into your space with a notepad. Measure dimensions: length, width, height. Note doors, windows, outlets, and HVAC vents.
List all tools and materials. Categorize them:
- Power tools (drills, saws)
- Hand tools (hammers, chisels)
- Consumables (screws, sandpaper)
- Lumber and clamps
Take "before" photos. Imagine your workbench in the center, storage on walls.
Common mistake: Skipping measurements. Result? Ill-fitting shelves.
Pro tip: Use your phone's measure app for quick accuracy.
Materials and Tools Needed for the Full Project
Gather these basics upfront. Total cost: under $200 if buying new.
| Item | Estimated Cost | Purpose |
|---|---|---|
| Pegboard sheets (4x8 ft) | $20 each | Wall storage |
| Pegboard hooks assortment | $15 | Hanging tools |
| Plywood (1/2-inch, 4x8 sheets) | $30 | Shelves/French cleats |
| Bins/plastic totes | $10-20 | Small parts |
| Wood screws (assorted) | $10 | Assembly |
| Labels/marker | $5 | Organization |
| Shop vac or dust collector | $50 (basic) | Dust control |
Tools: Tape measure, level, drill, saw, ladder.
Step 2: Plan Your Layout for Efficiency
Sketch a floor plan. Place the workbench centrally for easy access.
Group zones:
- Tool storage near the bench
- Lumber rack along one wall
- Finishing area away from dust sources
Aim for a workflow: Raw materials in → Workbench → Finishing → Out.
Vertical space is gold in small shops. Walls go up to the ceiling.
Before: Tools scattered on floor. After: Everything off the ground, paths clear.
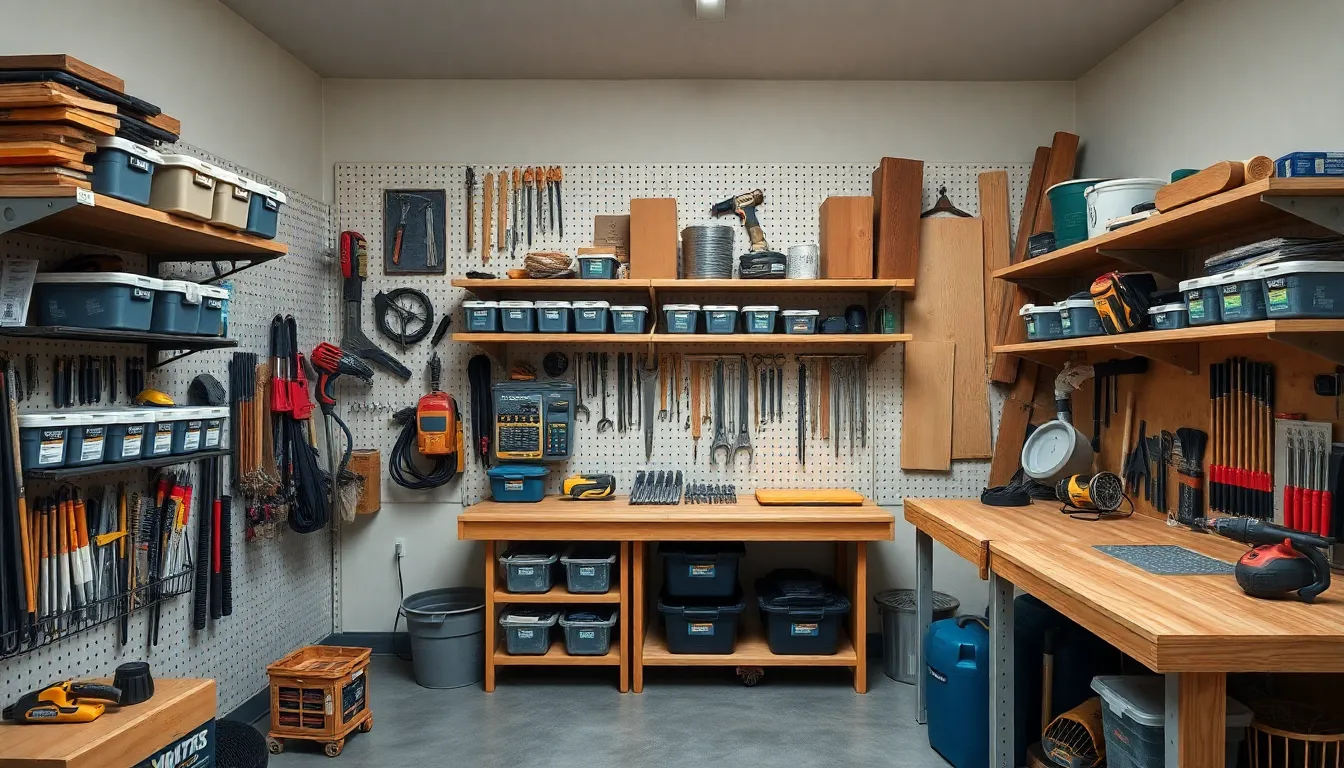
Step 3: Install Pegboard for Versatile Tool Storage
Pegboard is a budget hero at $20 per sheet.
DIY Pegboard Wall Under $50
Materials: One 4x8 pegboard ($20), 1x2 furring strips ($10), screws ($5), hooks ($15).
Steps:
-
Measure wall section (e.g., 4x8 ft).
-
Cut furring strips to frame edges. Screw to studs every 16 inches.
-
Hang pegboard on frame. Secure with screws.
-
Add hooks: Outline shapes for chisels, pliers.
Before: Tools in drawers, hard to find. After: Visual inventory at a glance.
Mistake: No backing board. Fix: Use plywood behind for strength.
Step 4: Build Simple Shelves for Lumber and Bins
Shelves beat floor piles.
DIY Wall Shelves Under $30
Materials: 1x4 lumber ($15), plywood shelf ($10), brackets ($5).
Steps:
-
Mark stud locations.
-
Install brackets at 24-inch intervals, 36-48 inches high.
-
Cut plywood to fit. Screw down.
-
Add bins for screws/nails.
Group by size: Top for lightweight, bottom for heavy.
Vertical hack: Notch shelves for pipes/clamps.
Step 5: Master French Cleats for Modular Storage
French cleats let you rearrange without tools. Perfect for evolving shops.
DIY French Cleat System Under $40
Materials: 3/4-inch plywood ($25 for scraps), screws ($5), bins/boards ($10).
Steps:
-
Cut plywood strips at 45-degree bevel (one side).
-
Mount cleat to wall on studs.
-
Attach mating cleat to bins or tool boards.
-
Hang: Gravity locks them.
Store sandpaper, clamps, or jigs. Swap as needed.
Before: Fixed shelves, wasted space. After: Customizable zones.
Pitfall: Weak angles. Use table saw or circular saw with guide.
Step 6: Optimize Your Workbench
A cluttered bench kills productivity.
Clear it first. Keep only in-use tools.
Add a lower shelf for vises/clamps. Use drawers for bits.
DIY drawer dividers: Cardboard or scrap wood.
Shadow boards on walls: Foam or paint outlines for wrenches/screwdrivers.
Integrate power: Mount outlets above.
Step 7: Vertical Storage Hacks to Free Floor Space
Walls and ceilings are untapped.
- Overhead lumber rack: 2x4s on chains ($20).
- Ceiling hooks for bikes, extension cords.
- Magnetic strips for bits/scrapers ($10).
Steps for lumber rack:
-
Install eye bolts in ceiling joists.
-
Hang chains, add 2x4 slats.
-
Slide boards between.
Safety: Weight limit 50 lbs per foot.
Step 8: Integrate Dust Management on a Budget
Dust buries organization.
Hook shop vac to tools. Use $20 cyclone separator.
PVC pipes as ducts: DIY blast gates from bottles.
Daily sweep: Magnetic dust pan for metal shavings.
Zone it: Mats under saws catch debris.
Step 9: Group, Label, and Maintain Inventory
Group logically: Saws together, clamps separate.
Label everything. Use printed labels or chalkboard paint.
Systems:
- Clear bins with front labels
- Tool silhouettes on pegboard
- Inventory sheet app (free like Sortly)
Weekly 15-minute tidy: Put away as you go.
Your Complete Step-by-Step Organization Plan
Tie it all together in one weekend.
-
Declutter (Day 1, 2 hours): Sort tools into keep/sell/donate. Sell extras on Facebook Marketplace.
-
Measure and plan (1 hour): Sketch layout.
-
Install backbone storage (Day 1 afternoon): Pegboard and shelves.
-
Build French cleats (Day 2 morning): Add modular boards.
-
Organize tools (2 hours): Group, label, hang.
-
Workbench and vertical hacks (2 hours): Clear, add racks.
-
Dust setup (1 hour): Vac hoses, mats.
-
Test and photo "after" (30 min): Walk through workflow.
Total time: 10 hours. Cost: $100-150.
Before example: Garage floor buried in sawdust, tools everywhere. No room to walk.
After: Clear paths, everything finds a home in seconds.
DIY Builds Under $50: Quick Wins
$15 Clamp Rack
2x4 angled on wall. Slots for bars.
$25 Sandpaper Organizer
PVC pipes in French cleat. Roll access.
$30 Mobile Tool Cart
Casters on plywood base. Pegboard back.
Each build: 1 hour, scrap-friendly.
Common Pitfalls and How to Avoid Them
-
Overbuying: Inventory first. Mistake wastes $.
-
Ignoring workflow: Tools far from bench? Rearrange.
-
Poor lighting: Add $10 LED strips. See labels clearly.
-
Heavy top shelves: Risk of collapse. Distribute weight.
-
No labels: Chaos returns fast. Label boldly.
Beginners often cram too much. Sell what you don't use yearly.
Maintaining Order Over Time
Habits beat one-time cleans.
-
End-of-session rule: 5-minute put-away.
-
Monthly audit: Reorganize as skills grow.
-
Family buy-in: Assign zones.
Track with photos. Evolving shop? French cleats adapt.
Troubleshooting Tips
Problem: Pegboard sags.
Solution: Add horizontal furring every 4 feet.
Dust everywhere?
Vacuum daily; seal gaps with foam.
Workbench too small?
Fold-down walls for extra space.
Tools lost in bins?
Color-code: Red for finishing, blue for joinery.
Outgrowing space?
Go vertical or purge. Rent storage for lumber.
You're now set to enjoy woodworking without frustration. Start small—one wall today. Your shop will thank you!
(Word count approx. 2050)